Table of Contents
Introduction
The chroot command in Linux is a powerful tool that allows system administrators and users to change the root directory of a running process. By using chroot, you can isolate the execution environment of a program, creating a controlled space where only specific files and directories are accessible. This is particularly useful for system recovery, security testing, and creating isolated environments for specific applications.
In this comprehensive guide, we will explore how the chroot command works, common use cases, examples, and best practices. Whether you’re a Linux beginner or a seasoned sysadmin, understanding the chroot command can greatly improve your ability to manage and secure your Linux systems.
What is the chroot Command?
Definition
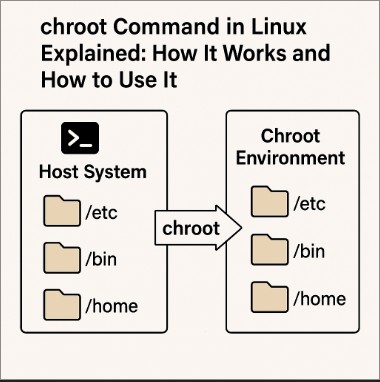
The chroot (change root) command changes the root directory for the current running process and its children to a specified directory. Once the root directory is changed, the process and its child processes can only access files within that new root directory, as if it were the actual root filesystem.
This command essentially limits the scope of a process, which can be helpful in a variety of situations, such as:
- Creating isolated environments: Isolate applications or services to minimize risk.
- System recovery: Boot into a rescue environment or perform recovery tasks.
- Security testing: Test applications in a contained environment to prevent potential damage to the main system.
How It Works
When you execute the chroot command, the kernel reconfigures the root directory (denoted as /) for the invoked command and all its child processes. The process can only see and interact with files that are within this new root directory, and any attempts to access files outside of this area will fail, providing a form of sandboxing.
For example, if you use chroot to set the root directory to /mnt/newroot, the process will not be able to access anything outside of /mnt/newroot, including the original system directories like /etc or /home.
How to Use the chroot Command
Basic Syntax
The syntax for the chroot command is straightforward:
chroot <new_root_directory> <command_to_run><new_root_directory>: The path to the directory you want to use as the new root directory.<command_to_run>: The command or shell you want to run in the new root environment.
Example 1: Basic chroot Usage
To get started, let’s say you want to run a simple shell (/bin/bash) in a chrooted environment located at /mnt/newroot. You would execute the following:
sudo chroot /mnt/newroot /bin/bashThis command changes the root to /mnt/newroot and starts a new shell (/bin/bash) inside the chroot environment. At this point, any commands you run will only have access to files and directories within /mnt/newroot.
Example 2: Running a Program in a Chroot Jail
Suppose you have an application that you want to run in isolation for testing purposes. You can use chroot to execute the program in a contained environment:
sudo chroot /mnt/testenv /usr/bin/myappHere, /mnt/testenv is the new root directory, and /usr/bin/myapp is the application you want to execute. The application will be sandboxed within /mnt/testenv and won’t have access to the actual system files outside this directory.
Example 3: Chroot for System Recovery
One of the most common use cases for chroot is when recovering a system after a crash or when needing to repair files on a non-booting system. You can boot from a live CD or USB, mount the system partition, and then use chroot to repair the installation.
Advanced Use of chroot
Setting Up a Chroot Environment from Scratch
You can set up a complete chroot environment from scratch. This is useful for building isolated environments for testing or running custom applications. Here’s how you can create a basic chroot environment:
- Create a directory to be used as the new root:
sudo mkdir -p /mnt/chroot
- Copy necessary files into the new root directory:
sudo cp -r /bin /mnt/chroot
sudo cp -r /lib /mnt/chroot
sudo cp -r /etc /mnt/chroot
sudo cp -r /usr /mnt/chroot
3. Chroot into the environment:
sudo chroot /mnt/chrootAt this point, you’ll be inside the newly created chroot environment with a minimal set of files.
Using chroot with Systemd
In systems that use systemd, you can set up a chroot environment with a systemd service. This allows you to manage services and processes within the chrooted environment. Here’s how you can do this:
Install the necessary systemd components inside the chroot environment:
sudo mount --bind /run /mnt/chroot/run
sudo mount --bind /sys /mnt/chroot/sys
sudo mount --bind /proc /mnt/chroot/proc
sudo mount --bind /dev /mnt/chroot/dev
Enter the chroot and start a systemd service:
sudo chroot /mnt/chroot
systemctl start <service_name>
Security Considerations with chroot
While chroot provides a level of isolation for processes, it is not foolproof. A process inside a chrooted environment can potentially break out of the jail if it has sufficient privileges, such as root access. To mitigate this risk:
- Minimize Privileges: Run only necessary processes inside the chrooted environment with the least privileges.
- Use Additional Security Tools: Combine
chrootwith tools likeAppArmororSELinuxto add extra layers of security.
FAQ: Frequently Asked Questions
1. Can chroot be used for creating virtual environments?
Yes, chroot can create virtual environments where applications run in isolation, preventing them from accessing the host system’s files. However, it’s worth noting that chroot is not a full virtual machine or container solution, so it doesn’t provide complete isolation like Docker or VMs.
2. What is the difference between chroot and Docker?
While both chroot and Docker provide isolated environments, Docker is much more comprehensive. Docker containers come with their own filesystem, networking, and process management, whereas chroot only isolates the filesystem and does not manage processes or provide networking isolation. Docker is a more modern and robust solution for containerization.
3. Can chroot be used on all Linux distributions?
Yes, chroot is available on most Linux distributions, but the steps to set it up (such as mounting necessary filesystems) may vary depending on the specific distribution. Be sure to check the documentation for your distribution if you encounter issues.
4. Does chroot require root privileges?
Yes, using chroot typically requires root privileges because it involves changing the root directory, which is a system-level operation. You can use sudo to execute the command with elevated privileges.
5. Is chroot a secure way to sandbox applications?
While chroot provides some isolation, it is not foolproof. For a higher level of security, consider using more advanced tools like containers (Docker) or virtualization technologies (VMs) to sandbox applications.
Conclusion
The chroot command in Linux is a versatile tool that allows users to create isolated environments for processes. From system recovery to testing applications in a secure space, chroot provides an easy-to-use mechanism to manage processes and files in a controlled environment. While it has limitations, especially in terms of security, when used correctly, chroot can be a valuable tool for Linux administrators.
By understanding how chroot works and how to use it effectively, you can better manage your Linux systems and ensure that critical processes and applications run in a secure, isolated environment. Thank you for reading the DevopsRoles page!
For further reading, check out these external links: