Table of Contents
Introduction
Hi everyone, today I am going to show everyone how to set up an SSL / TLS connection from the client to the AWS RDS Oracle Database.
Prepare AWS RDS Oracle Database
- An EC2 instance with Windows Server 2019.
- An RDS Oracle instance (12.1.0.2.v19)
- Connect normal to RDS Oracle instance with TCP protocol
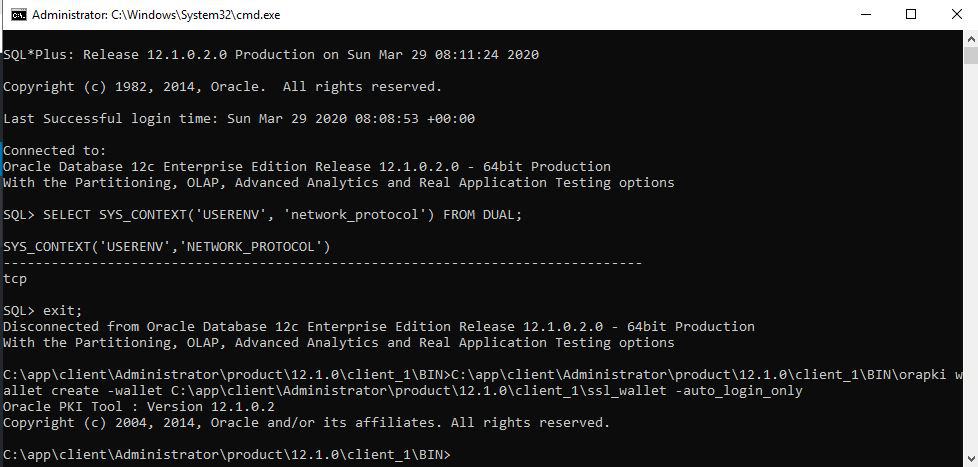
Check the current connection with the following command
sqlplus admin/admin12345@(DESCRIPTION=(ADDRESS=(PROTOCOL=TCP)(HOST=orcl12.xxxxxxx.ap-northeast-1.rds.amazonaws.com)(PORT=1521))(CONNECT_DATA=(SID=SSLLAB)))
sqlplus > SELECT SYS_CONTEXT('USERENV', 'network_protocol') FROM DUAL;
Task today
- Modify the DB instance to change the CA from rds-ca-2015 to rds-ca-2019.
- Adding the SSL Option
- Using SQL*Plus for SSL/TLS connections(with Oracle Wallets).
- Using SQL Developer for SSL/TLS connections(with JKS).
- Using JDBC to establish SSL/TLS connections(with JKS).
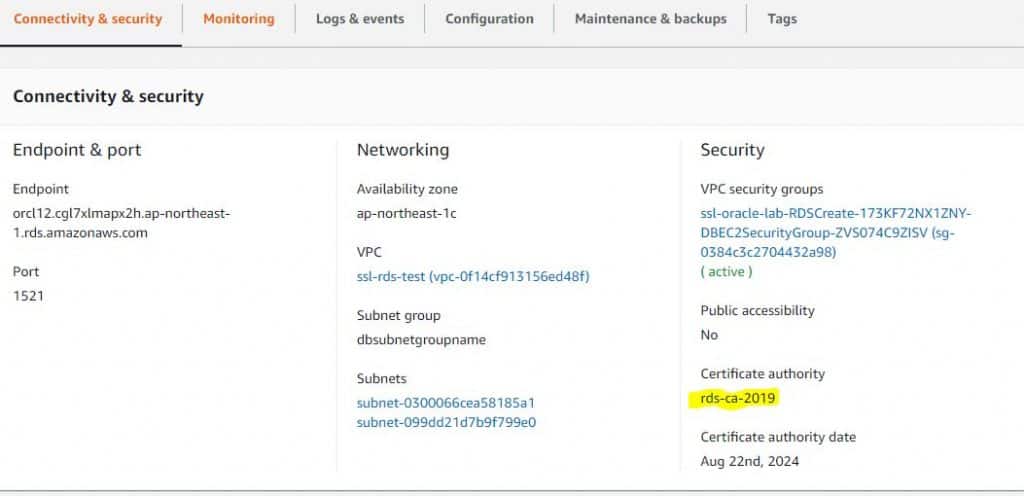
Modify the DB instance to change the CA from rds-ca-2015 to rds-ca-2019
1. Sign in to the AWS Management Console and open the Amazon RDS console at https://console.aws.amazon.com/rds/.
2. In the navigation pane, choose Databases, and then choose the DB instance that you want to modify.
3. Choose Modify. The Modify DB Instance page appears.
4. In the Network & Security section, choose rds-ca-2019.
5. Choose Continue and check the summary of modifications.
6. To apply the changes immediately, choose Apply immediately. Choosing this option restarts your database immediately.
Adding the SSL Option
1. Create or Modify an existing option group to which you can add the SSL option for your RDS intance.
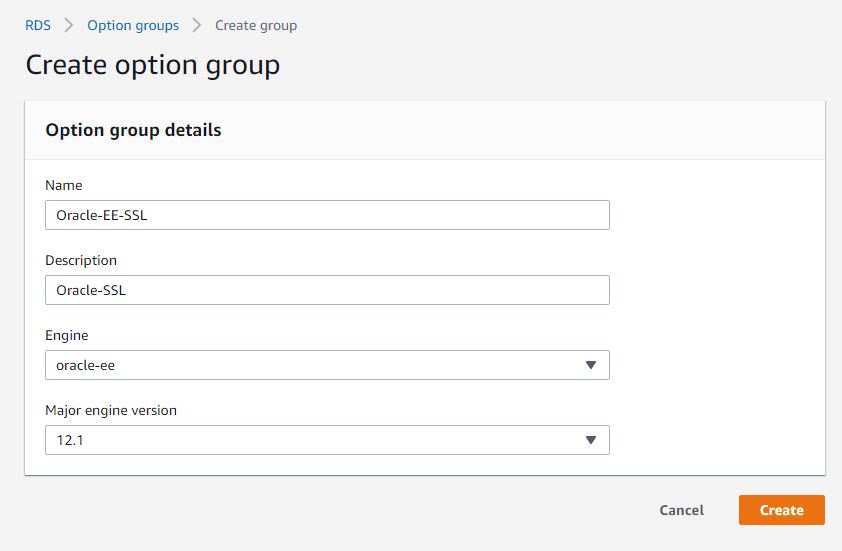
Add the SSL option to the option group.
Setting the option
SQLNET.CIPHER_SUITE:SSL_RSA_WITH_AES_256_CBC_SHA
SQLNET.SSL_VERSION:1.0 or 1.2
FIPS.SSLFIPS_140:TRUE
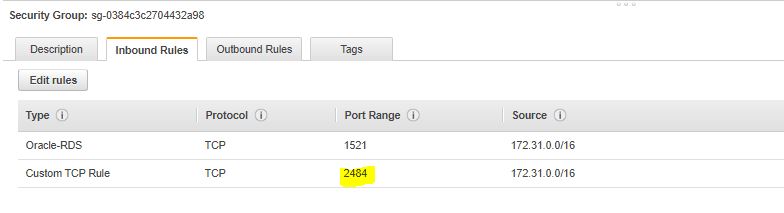
2. Setting Security Group using for your RDS Oracle instance with allow inbound PORT 2484, Source Range is your IPv4 CIDR VPC or EC2 instance client.
Using SQL*Plus for SSL/TLS connections
1. Download middleware
- Oracle Database Client (12.1.0.2.0) for Microsoft Windows (x64) require for
orapkiUtility(download link).
Install Folder path: C:\app\client\Administrator\product\12.1.0\client_1
2. Download the 2019 root certificate that works for all AWS Regions and put the file in the ssl_wallet directory.
https://s3.amazonaws.com/rds-downloads/rds-ca-2019-root.pem
Folder path: C:\app\client\Administrator\product\12.1.0\client_1\ssl_wallet
3. Run the following command to create the Oracle wallet.
C:\app\client\Administrator\product\12.1.0\client_1\BIN\orapki wallet create -wallet C:\app\client\Administrator\product\12.1.0\client_1\ssl_wallet -auto_login_only
4. Run the following command to add a cert to the Oracle wallet.
C:\app\client\Administrator\product\12.1.0\client_1\BIN\orapki wallet add -wallet C:\app\client\Administrator\product\12.1.0\client_1\ssl_wallet -trusted_cert -cert C:\app\client\Administrator\product\12.1.0\client_1\ssl_wallet\rds-ca-2019-root.pem -auto_login_only5. Run the following command to confirm that the wallet was updated successfully.
C:\app\client\Administrator\product\12.1.0\client_1\BIN\orapki wallet display -wallet C:\app\client\Administrator\product\12.1.0\client_1\ssl_wallet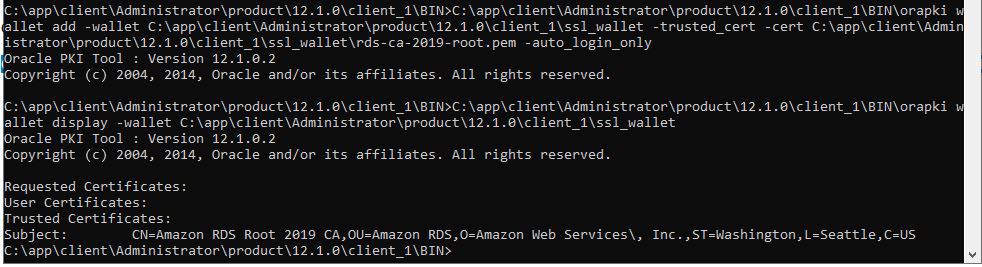
6. Create the net service name to log in with SQL*PLUS.
- Create a file name C:\app\client\Administrator\product\12.1.0\client_1\network\admin\tnsnames.ora with content.
ORCL12 =
(DESCRIPTION =
 (ADDRESS = (PROTOCOL = TCPS)(HOST = orcl12.xxxxxxx.ap-northeast-1.rds.amazonaws.com)(PORT = 2484))
 (CONNECT_DATA=
  (SERVER = DEDICATED)
  (SERVICE_NAME = SSLLAB))
 )
)- Edit C:\app\client\Administrator\product\12.1.0\client_1\network\admin\sqlnet.ora file with content.
WALLET_LOCATION=
  (SOURCE=
      (METHOD=file)
      (METHOD_DATA=
         (DIRECTORY=C:\app\client\Administrator\product\12.1.0\client_1\ssl_wallet)))
SSL_CLIENT_AUTHENTICATION = FALSE
SSL_VERSION = 1.2
SSL_CIPHER_SUITES = (SSL_RSA_WITH_AES_256_CBC_SHA)
SSL_SERVER_DN_MATCH = NO
SQLNET.AUTHENTICATION_SERVICES = (TCPS,TNS)
NAMES.DIRECTORY_PATH= (TNSNAMES, EZCONNECT) - Setting TNS_ADMIN user environment
TNS_ADMIN = C:\app\client\Administrator\product\12.1.0\client_1\network\admin\7. Test connect with SQL*PLUS
sqlplus admin/admin12345@(DESCRIPTION=(ADDRESS=(PROTOCOL=TCPS)(HOST=orcl12.xxxxxxxxx.ap-northeast-1.rds.amazonaws.com)(PORT=2484))(CONNECT_DATA=(SID=SSLLAB)))or with TNS name servicesqlplus admin/admin12345@ORCL12
SELECT SYS_CONTEXT('USERENV', 'network_protocol') FROM DUAL;
tcps
Using SQL Developer for SSL/TLS connections
1. Download middleware
- Download and install Win64 OpenSSL
2. Convert the certificate to .der format using the following command.
openssl x509 -outform der -in C:\app\client\Administrator\product\12.1.0\client_1\ssl_wallet\rds-ca-2019-root.pem -out rds-ca-2019-root.der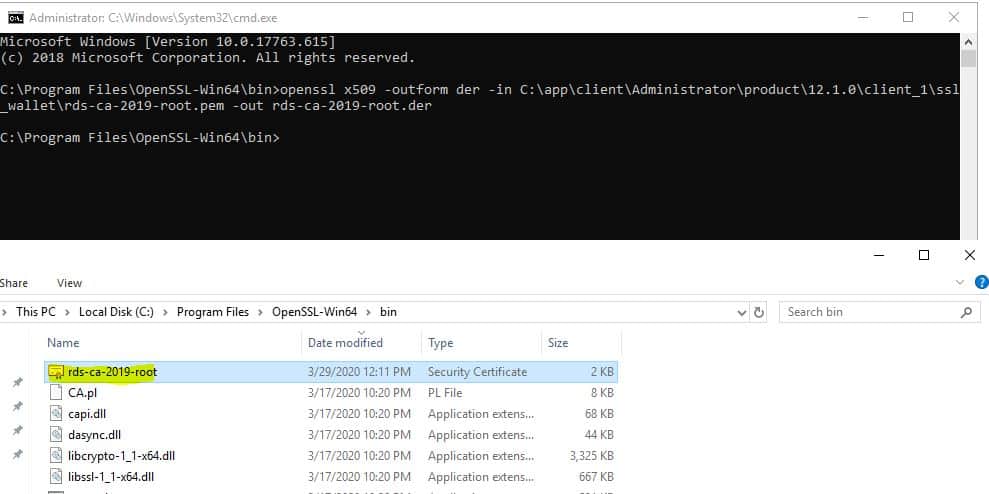
Copy the output file to C:\app\client\Administrator\product\12.1.0\client_1\ssl_wallet\rds-ca-2019-root.der
3. Create the Keystore using the following command.
C:\app\client\Administrator\product\12.1.0\client_1\jdk\bin\keytool -keystore clientkeystore -genkey -alias client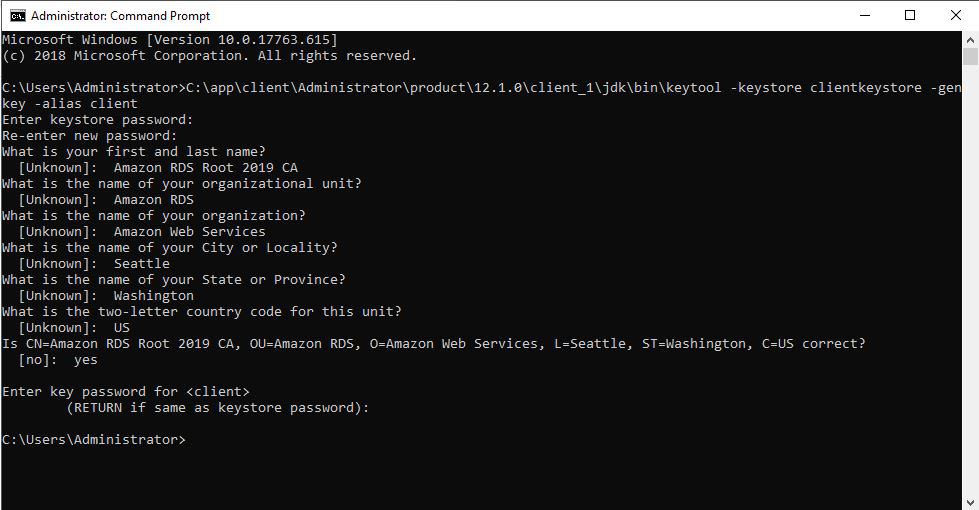
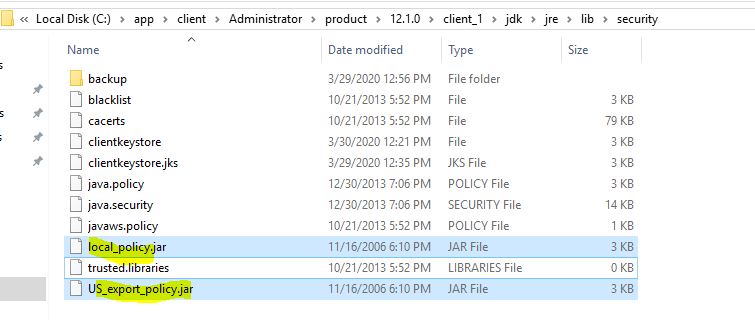
Copy the output file to C:\app\client\Administrator\product\12.1.0\client_1\jdk\jre\lib\security\clientkeystore
4. Import the certificate into the key store using the following command.
C:\app\client\Administrator\product\12.1.0\client_1\jdk\bin\keytool -import -alias rds-root -keystore C:\app\client\Administrator\product\12.1.0\client_1\jdk\jre\lib\security\clientkeystore -file C:\app\client\Administrator\product\12.1.0\client_1\ssl_wallet\rds-ca-2019-root.derInput pass of clientkeystore and confirm yes at below question , to import cert.Trust this certificate? [no]: yes Certificate was added to keystore
5. Confirm that the key store was updated successfully.
C:\app\client\Administrator\product\12.1.0\client_1\jdk\bin\keytool -list -v -keystore C:\app\client\Administrator\product\12.1.0\client_1\jdk\jre\lib\security\clientkeystore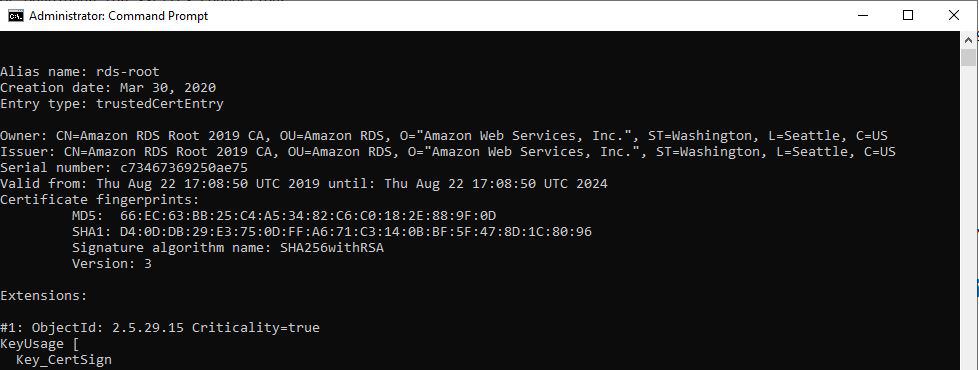
6. Down the new version of JCE for JDK6, and remove the old jar file, copy the new jar file to under directory C:\app\client\Administrator\product\12.1.0\client_1\jdk\jre\lib\security\
Note: If you using other versions of jdk, please refer to the following link and download the correct version of JCE.
https://blogs.oracle.com/java-platform-group/diagnosing-tls,-ssl,-and-https
7. Config C:¥app¥client¥sqldeveloper¥sqldeveloper¥bin¥sqldeveloper.conf file, add the following line.
SetJavaHome C:\app\client\Administrator\product\12.1.0\client_1\jdk
#Configure some JDBC settings
AddVMOption -Djavax.net.ssl.trustStore=C:\app\client\Administrator\product\12.1.0\client_1\jdk\jre\lib\security\clientkeystore
AddVMOption -Djavax.net.ssl.trustStoreType=JKS
AddVMOption -Djavax.net.ssl.trustStorePassword=admin12345
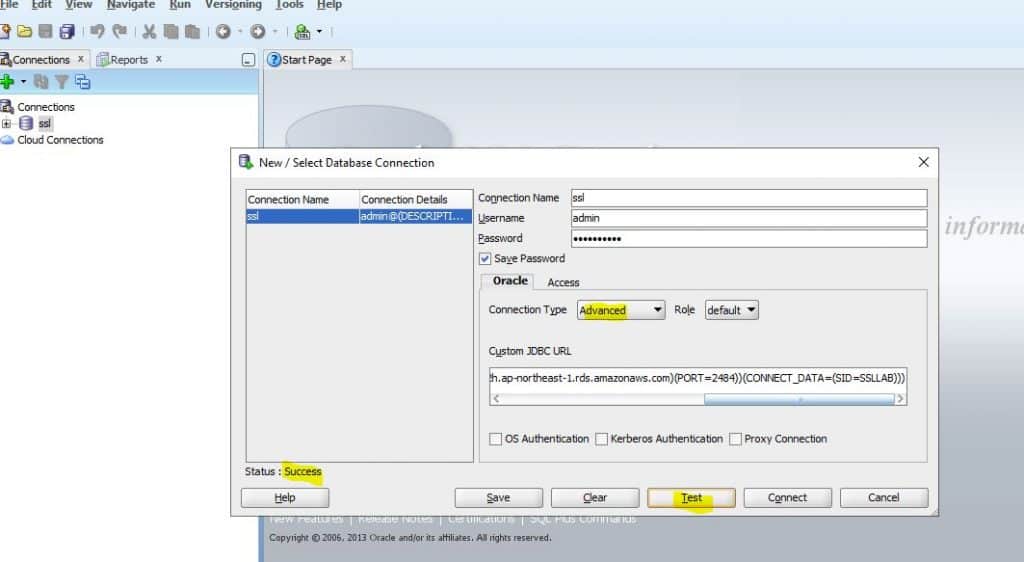
AddVMOption -Doracle.net.ssl_cipher_suites=TLS_RSA_WITH_AES_256_CBC_SHA8. Test connect to AWS RDS Oracle instance with SQL developer tool with the connection string.
jdbc:oracle:thin:@(DESCRIPTION=(ADDRESS=(PROTOCOL=TCPS)(HOST=orcl12.cgl7xlmapx2h.ap-northeast-1.rds.amazonaws.com)(PORT=2484))(CONNECT_DATA=(SID=SSLLAB)))
Using JDBC to establish SSL/TLS connections
1. Source code sample.
The following code example shows how to set up the SSL connection using JDBC.
import java.sql.Connection;
import java.sql.DriverManager;
import java.sql.SQLException;
import java.util.Properties;
public class OracleSslConnectionTest {
private static final String DB_SERVER_NAME = "orcl12.xxxxxx.ap-northeast-1.rds.amazonaws.com";
private static final String SSL_PORT = "2484";
private static final String DB_SID = "SSLLAB";
private static final String DB_USER = " admin";
private static final String DB_PASSWORD = "admin12345";
private static final String KEY_STORE_FILE_PATH = "C:\\app\\client\\Administrator\\product\\12.1.0\\client_1\\jdk\\jre\\lib\\security\\clientkeystore";
private static final String KEY_STORE_PASS = "admin12345";
private static final String SSL_CIPHER_SUITES = "TLS_RSA_WITH_AES_256_CBC_SHA";
public static void main(String args[]) throws SQLException {
final Properties properties = new Properties();
final String connectionString = String.format(
"jdbc:oracle:thin:@(DESCRIPTION=(ADDRESS=(PROTOCOL=TCPS)(HOST=%s)(PORT=%s))(CONNECT_DATA=(SID=%s))(SECURITY = (SSL_SERVER_CERT_DN = \"CN=Amazon RDS Root 2019 CA,OU=Amazon RDS,O=Amazon Web Services, Inc.,ST=Washington,L=Seattle,C=US\")))",
DB_SERVER_NAME, SSL_PORT, DB_SID);
properties.put("user", DB_USER);
properties.put("password", DB_PASSWORD);
properties.put("javax.net.ssl.trustStore", KEY_STORE_FILE_PATH);
properties.put("javax.net.ssl.trustStoreType", "JKS");
properties.put("javax.net.ssl.trustStorePassword", KEY_STORE_PASS);
properties.put("oracle.net.ssl_cipher_suites", SSL_CIPHER_SUITES);
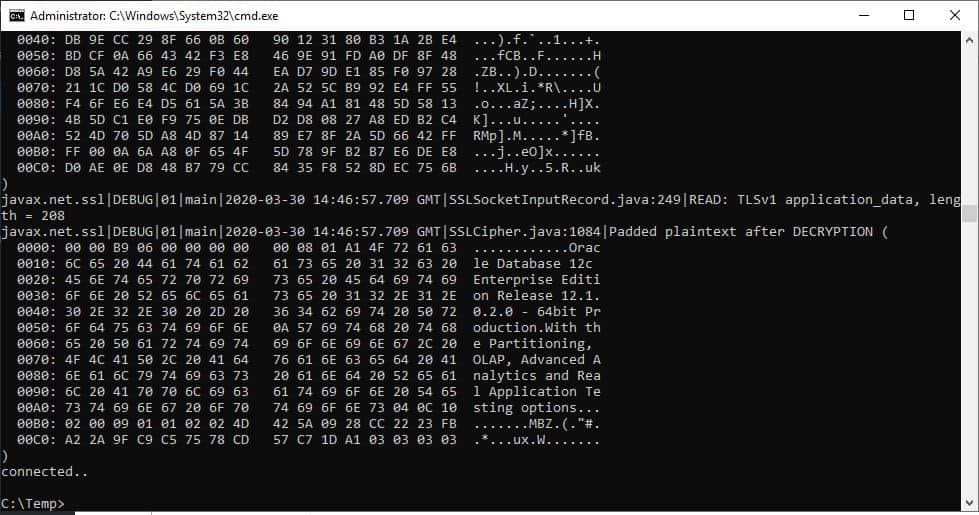
final Connection connection = DriverManager.getConnection(connectionString, properties);
// If no exception, that means handshake has passed, and an SSL connection can be opened
System.out.println("connected..");
}
}2. Test connect to AWS RDS Oracle instance with JDBC thin driver.
java -Djavax.net.debug=all -cp .;C:\app\client\Administrator\product\12.1.0\client_1\jdbc\lib\ojdbc7.jar OracleSslConnectionTest
The end.Good luck to you and happy with AWS cloud.
Thank you for reading the DevopsRoles page!